Thursday, August 21, 2014

Pretty Woman Review: "Speckle" Collection

This afternoon I have three polishes by Pretty Woman to share with you. These polishes are from their "Speckle" Collection.


First up, is "Deliciously Scrumptious"


Macro shot of "Deliciously Scrumptious"


"Deliciously Scrumptious" is a bubblegum pink creme polish jam packed with black hex micro glitter. Shown above is two coats without a top coat. 


Next up, is "Mint Choco Chip"


Macro shot of "Mint Choco Chip"


"Mint Choco Chip" is a dark mint green creme polish with black hex micro glitter throughout. Shown above is two coats without a top coat.


Last up, is "Choco Chip"


Macro shot of "Choco Chip"


"Choco Chip" is an off white creme polish filled with black hex micro glitter. Shown above is two coats without a top coat. This is definitely my favorite of the three! I'd kill for some chocolate chip ice cream right now. Pretty Woman polish always makes me hungry for something tasty. 


The "Speckle" Collection by Pretty Woman is absolutely delectable. Yes, I said it - delectable. Polish can be delicious ladies, let me tell you! Please do not eat the polish though! That would be no bueno. The formula for these polishes is wonderful and application was smooth and creamy. They are definitely "one coater" polishes but you know me! I can't help myself. Two is better than one after all. I'm almost positive that these are the only polishes in this collection so far but I am seriously hoping they make more! I am a sucker for glitter filled creme polishes. If you'd like to purchase any of these polishes or check out more products by Pretty Woman, click here. You can also purchase Pretty Woman products at your local Rite Aid. 

Monday, August 18, 2014

Bliss Kiss "Lets Get Naked" 3-Day Hydration Challenge

On Friday, August 15th, I decided to take on the Bliss Kiss "Lets Get Naked" 3-Day Hydration Challenge. When I started this challenge, I did not realize how hard it would be to not paint my nails for three days straight! But let me tell you, it was. Am I glad I didn't paint them though? Yes, I most definitely am!

If you haven't heard of Bliss Kiss or the "Lets Get Naked" 3-Day Hydration Challenge - click here to check out Ana's (creator of Bliss Kiss) website.


Here is my before and after. Shown above is Cindy (my right, dominant hand.) I decided to highlight Cindy for this challenge because she is the one who is always getting neglected. I have way more issues with my cuticles on Cindy than I do on my left hand. As you can clearly see, Cindy is looking SO much better than she did when I first started this 3-Day Hydration Challenge. My cuticles and sidewalls look and feel so much healthier and hydrated, I am in AWE! I am positive that the longer I use Bliss Kiss, along with my first love(cuticle oil) Sweet Baby by Donna, my cuticles and nails will continue to improve in length, strength, and health. I am now an official member of the Baby Bliss Club and could not be more happy about it!

If you'd like to purchase or check out Baby Bliss products, click here. If you'd like to purchase or check out Sweet Baby by Donna products, click here. 

Thursday, August 14, 2014

Holorific Goodness! Ooh La Lacquer Time

This afternoon I have two swatches of polishes by Ooh La Lacquer @oohlanastassia and a mani featuring those two polishes.


First up, is "Duchess of Holo"


Macro shot of "Duchess of Holo"


"Duchess of Holo" is a gold linear holographic polish. Shown above is two coats without a top coat. This polish is a stunner! My mouth dropped completely open when I put this baby on. Application was smooth and easy (especially since the brushes Nastassia uses are big and chunky, my absolute favorite) and the formula was perfection. I am in love with this polish and did not want to take it off! If you'd like to see a video swatch of this polish, click here.


Next up, is "Coral Reefer Madness"


Macro shot of "Coral Reefer Madness"


"Coral Reefer Madness" is a bright coral linear holographic polish. Shown above is two coats without a top coat. Another slam dunk by Nastassia! Again, application was smooth and the formula was flawless. If you'd like to see a video swatch of this polish, click here. I am so in love with both of these polishes (and every other Ooh La Lacquer polish.) There is NO WAY I could pick a favorite. 


Now it's time for the base. The polishes I used are "White on White" by China Glaze, "Duchess of Holo" and "Coral Reefer Madness" by Ooh La Lacquer @oohlanastassia. If you'd like to read a review on "White on White" by China Glaze, check out my blog post "Polka Dots and Bows" by clicking here.


Now it's mani time!


Direct sunlight shot


Macro shot of my middle finger


I am absolutely obsessed with the finished product! These colors go so well together, it's insane! The technique I did for the middle and ring finger is kind of hard to explain and I feel like if I try, I will just confuse you all. I promise to do a video tutorial on this technique as soon as possible so you can all see how and try it for yourselves! Again, the polishes I used to do this mani (just in case some of you skipped ahead) are "White on White" by China Glaze, "Duchess of Holo", and "Coral Reefer Madness" by Ooh La Lacquer @oohlanastassia. If you'd like to purchase "White on White" or any other China Glaze product, you can do so by visiting your local Sally's. If you'd like to purchase these Ooh La Lacquer polishes I have shown you today or check out more polishes from Nastassia, you can do so by clicking here.

Tuesday, August 12, 2014

Bestie Twin Nails: Chevrons, blobs, and half moons - oh my!

This afternoon I have a Bestie Twin Nail mani to share with you that I did with my lovely friend Alison @candiedapplepolish. Below is a collage of our manis.


Alison's mani is on top and mine is on the bottom. If our watermarks weren't there, you would not be able to tell whose was whose! We never noticed this until now, but our nails (shape/size wise) are almost identical! Talk about a coincidence.


Before I get into the details of my mani, I would like to share with you a close up and details on Alison's. The polishes she used are "Mayhem" by Bliss Polish @blisspolish, "Raspberry Champagne" and "You've Got to be Orchid-ing Me" by Squishy Face Polish @squishynpolished. She got the mini chevron nail vinyls from Linda @teismom and the rhinestones from Charmingly Simple Nail Art @charminglysimplenailart. Alison does amazing nail art and also has her own line of indie polish, Candied Apple Polish, and let me tell you her polishes are AMAZING! If you'd like to check out her nail account, click here. If you'd like to check out her online store to see all her gorgeous polish creations, click here.


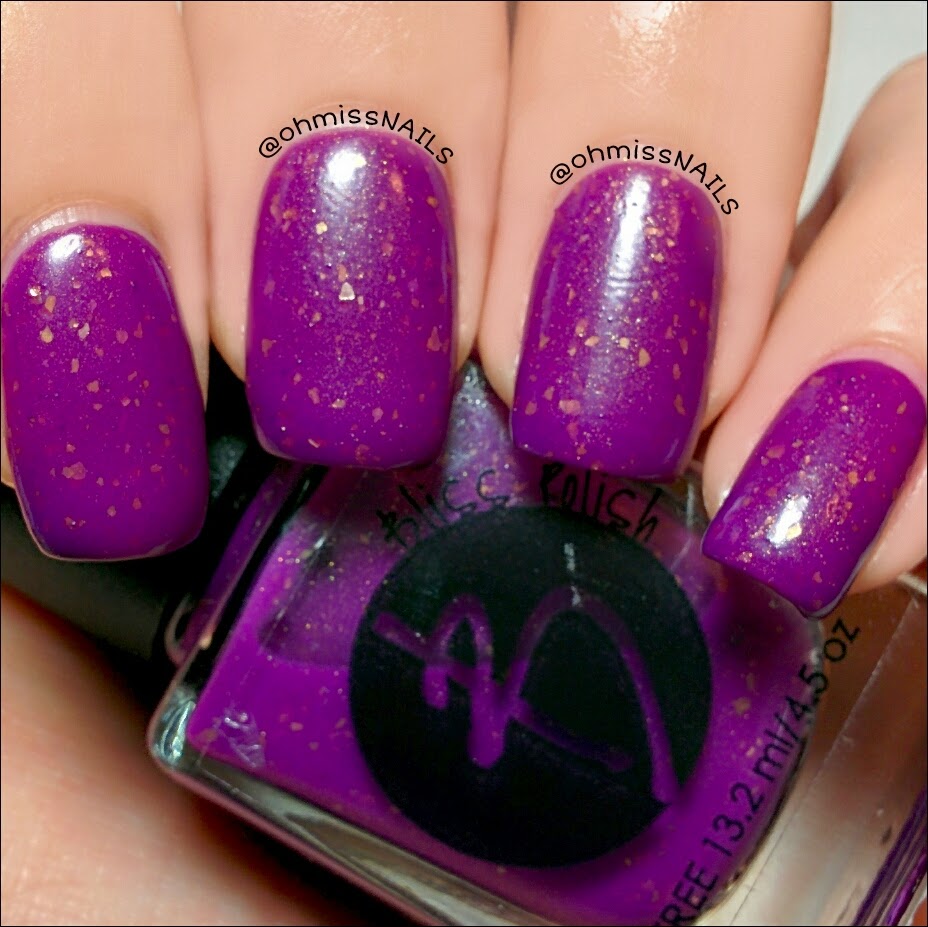
Now it's time for some swatches of the polishes I used to create my mani. First up, is "Orchid Bloom" by Bliss Polish @blisspolish. Shown above is two coats without a top coat. This bright purple polish with gold flakes throughout and a matte finish is absolutely amazing! I am in LOVE! Application was smooth and the formula was wonderful. Two thumbs up for this beauty.


Next up, is "Radiant" by Bliss Polish @blisspolish. Shown above is two coats without a top coat. This gorgeous purple holographic polish is a stunner. Just look at all the holo goodness! It is jam packed in this baby. Again, application was smooth and the formula was perfection. I am obsessed!


Now it's time for my base. The polishes I used are "Mayhem" and "Orchid Bloom" by Bliss Polish @blisspolish. If you'd like to see a swatch of "Mayhem", check out my blog post "Polish is Bliss" that I wrote sometime last week. This color combination is beautiful. I will most definitely be using these together again soon.


And finally, here is my finished mani up close and personal. I am in love with this design and how it came out. The polishes I used (for all you skippers out there) are "Orchid Bloom", "Radiant", and "Mayhem" by Bliss Polish @blisspolish. If you'd like to purchase any of these polishes or check out more polishes by Bliss Polish, click here. I used tiny chevron nail stencils by Sara @nails_redesigned to create the look on my pointer and pinky fingers. If you'd like to purchase these nail stencils or check out more of Sara's nail stencil designs, click here. Last but not least, I got the rhinestones (Product ID# 12409) from Born Pretty. If you'd like to purchase these rhinestones or check out more products by Born Pretty, click here. You can use my code DYJ61 for 10% off your order (already on sale items excluded.) 

Sunday, August 10, 2014

Puncha Yo' Buns

Tonight I have three polishes by Heather's Hues @heathers_hues to show you. These polishes are from Heather's new collection "Puncha Yo' Buns" which was released yesterday, August 9th. She was inspired to create this collection by the show Adventure Time which is her all time favorite cartoon to watch with her three sons.


First up, is "Homies, Always"


"Homies, Always" is a white crelly polish with different shaped and sized marigold, neon blue, neon green, black, and white glitters. Shown above is two coats without a top coat. Heather's inspiration to create this polish was Finn and Jake the dog who are the best of friends and will be for life! This polishes formula is absolutely amazing and application was ridiculously smooth. I am obsessed with this polish! As of right now, I only have a macro shot of this beauty but I promise to update this post with a regular swatch shot as soon as possible. 

Jake the dog and Finn


Next up, is "Don't Break Royal Promises"


Macro shot of "Don't Break Royal Promises"


"Don't Break Royal Promises" is a baby pink crelly polish jam packed with three different shades of pink glitters that has a hot pink shimmer to it in the light (optional baby blue dot matte glitters are available to be mixed in or sent on the side.) Shown above is two coats without a top coat. Heather's inspiration to create this polish was Princess Bubblegum. This polish is absolutely stunning. Even more so in person (yes, it's possible!) The formula is wonderful and application was flawless. I am in love!

Princess Bubblegum


Last but not least, my favorite of the three - "Oh My Glob!"


Macro shot of "Oh My Glob!"


"Oh My Glob!" is a lavender crelly polish with a variety of purple glitters and scattered holo throughout (optional star glitters are available to be mixed in or sent on the side.) Shown above is two coats with a top coat. Heather's inspiration to create this polish was Lumpy Space Princess, aka LSP, Heather's favorite Adventure Time princess. The formula and application was perfection, just like the first two polishes. I am absolutely, positively IN LOVE with it. Not only is it my favorite color - but it also has stars in it which is one of my all time favorite things in the world! 

Lumpy Space Princess


If you would like to purchase any of these polishes, check out the other six polishes from this collection, or see all the rest of Heather's polishes, click here. Don't forget to follow Heather on instagram! You can do so by clicking here. Go show Heather some love. She is just as amazing as all the polish she makes - you will LOVE her!

Thursday, August 7, 2014

Pretty Woman Review: "Feather" Collection - Part 3

This morning I have the last three polishes from the "Feather" Collection by Pretty Woman to share with you.


First up, is "Parrot"


Macro shot of "Parrot"


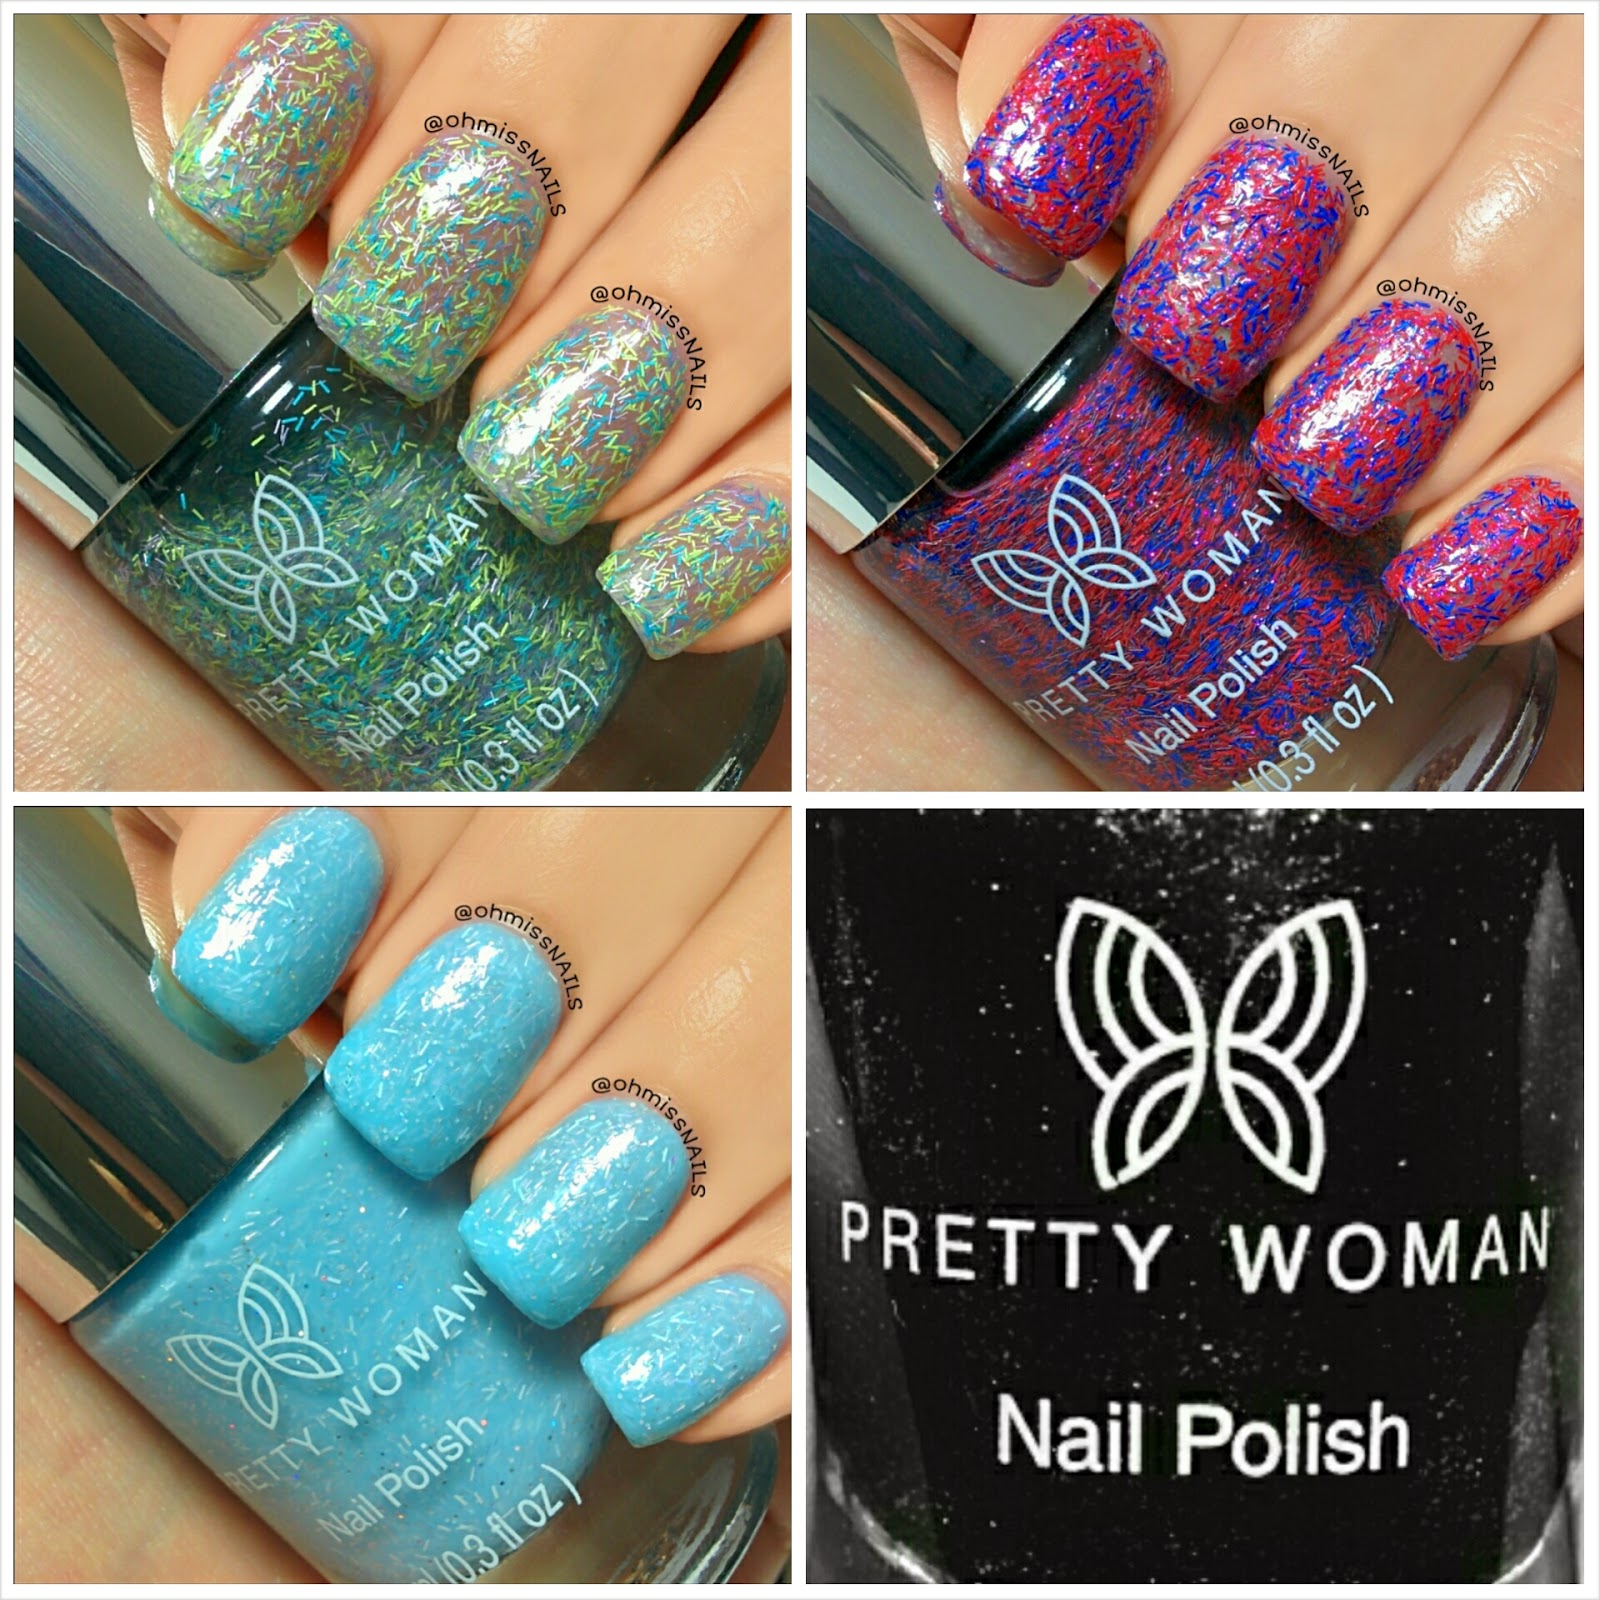
"Parrot" is a pastel purple, light blue, and yellow bar glitter polish with a clear base that has somewhat of a purple translucent tint to it. Shown above is three coats without a top coat. This is my favorite of the three I have for you all today. These colors go so perfectly together. I just love it!


Next up, is "Peacock"


Macro shot of "Peacock"


"Peacock" is a red and blue bar glitter polish with a clear base that has hot pink sparkles throughout. Shown above is two coats without a top coat. I love how much coverage I got with only two coats of this polish. The hot pink glitter in the base really made a difference!


Last but not least, is "Blue Jay"


Macro shot of "Blue Jay"


"Blue Jay" is a baby blue polish with white bar and holographic glitters throughout. Shown above is two coats without a top coat. This polish was a tad bit on the thick side, but nothing I couldn't handle. Doesn't change the fact that this polish is to die for!


My review on the "Feather" Collection by Pretty Woman can be found on my first nail post - Pretty Woman Review: "Feather" Collection - Part 1. There might be a chance that there could be a Part 4 to this collection in the future, but only time will tell! If you would like to purchase any of these polishes or check out more products by Pretty Woman click here. You can also purchase Pretty Woman products at your local Rite Aid. 

Wednesday, August 6, 2014

Pretty Woman Review: "Feather" Collection - Part 2

This morning I have three polishes from Pretty Woman to review. These polishes are from their "Feather" Collection.


First up, is "Orange Bishop"


Macro shot of "Orange Bishop"


"Orange Bishop" is an orange and white bar glitter polish with a clear base. Shown above is two coats without a top coat. This is my favorite of the three polishes I have for you today. It totally reminds me of an orange creamsicle. Those things are so tasty! 


Next up, is "Red Cardinal"


Macro shot of "Red Cardinal"


"Red Cardinal" is a bright orange bar glitter polish with a translucent red orange base. Shown above is two coats without a top coat.


The last polish I have for you today is "Kingfisher"


Macro shot of "Kingfisher"


"Kingfisher" is a red, blue, and yellow bar glitter polish with a clear base. Shown above is three coats without a top coat.


My thoughts on the "Feather" Collection can be found on my first "official" nail post - Pretty Woman Review: "Feather" Collection - Part 1. When I first started this blog, I didn't realize I'd have multiple blog posts on this collection. That's why I wrote my thoughts on the collection as a whole in my first post! Bare with me guys, I'm still getting used to this whole blogging thing. I feel like I'm getting the hang of it though! Woohoo! But I do have an update about something I wrote in that first blog post for you guys. I got my camera! As soon as I get a video editor program for my computer I will be filming a tutorial on how I apply bar glitter polish, so stay tuned. If you would like to purchase any of these polishes or check out more products by Pretty Woman click here. You can also purchase Pretty Woman products at your local Rite Aid. 

Monday, August 4, 2014

Polish is Bliss

This afternoon I have two polishes by Bliss Polish to show you and a mani using both of those polishes, nail stencils by Nails Redesigned, and metallic mini round studs from Born Pretty.


First up, is "Sweet Senti-Mint"


Macro shot of "Sweet Senti-Mint"


"Sweet Senti-Mint" is a mint polish with gold glitters throughout. Shown above is two coats with a top coat. This polish is absolutely gorgeous. The formula is wonderful and application was very smooth. The bigger circle glitters are a tad bit difficult to get out, but luckily there is enough to where you aren't fishing for them. All in all I am IN LOVE with this polish. Mint and gold is an amazing color combination.


Next up, is "Mayhem"


Macro shot of "Mayhem"


"Mayhem" is a stunning black holographic polish. Shown above is two coats with a top coat. I am absolutely, positively obsessed with this polish! The formula is amazing and application was a cinch. I cannot get over that macro shot! Look at all that rainbow holo goodness. This polish is perfection! 


Before I show you the finished mani, I thought you all would like a shot of the base. 


Look at those colors together! They are the perfect pair.


And now, it's mani time.


Macro shot of my ring finger


I am in love with the finished product! Especially the new technique I tried out on my middle and ring fingers. I was inspired to do this technique by Tam @ohmygoshpolish who was originally inspired by @anya_sobko. The polishes I used to do this mani are the ones listed above. If you'd like to purchase either of these polishes or check out Yvette's (creator of Bliss Polish) store to view more of her polishes, click here. I used Sara's @nails_redesigned wide chevron nail stencils to create the look on my pointer and pinky fingers. I know I've said this before, and I will probably say this a million more times, but these are the best nail stencils out there! They are so amazing - you HAVE to try them out! If you'd like to purchase these nail stencils or check out more of Sara's nail stencil designs, click here. Last but not least, I got the metallic mini round studs (Product ID# 14754) from Born Pretty. If you would like to purchase these studs or check out more of their products, click here. You can use my code DYJ61 for 10% off (already on sale items excluded.)